Friday, September 9, 2016

How to: Work Mats

Hello!

As I mentioned in my previous post, I am sharing my room this year with my good friend, which has provided a whole new set of challenges that I'd never even contemplated before!! Like name tags, and work mats!

Since two kids will be sitting in the same spot through out the day (my class from 7:45-11:06, and a pm kindergarten from 11:10-2:26) I couldn't very well tape a name tag to the table to designate that spot for one student. So how's a teacher supposed to make sure each kid has a specific spot just for them while still leaving freedom for the next teacher to do the same?

Simple! Work Mats!!!


I made work mats that provided the students with access to their name, left and right paw prints (we're the panthers after all), the sight words, colors, numbers and tens-frames, letters with beginning sounds pictures, and shapes. It seems like a lot, but so far it has really helped my littles to keep to their work space and have access to all the concepts we'll be working on all year long. Here's how I did it.

I started with a black piece of construction paper 12 x 18. I laid them out horizontal and assembled all my pieces. I glued store bought name tags to the top of it. You could write names on them right away, but with how my class changes between first day and final roster, I didn't want to write anything on it and then laminate over it. After the name tag I assembled the rest of the little pieces underneath and glued them down.
Sight word pieces
The mats with all the pieces
From there I laminated the whole thing and cut it out.


Viola! Handy dandy work mats that you can write on and move around easy as 1-2-3! I love, love, LOVE these things!!
Finished work mat!

I hope you found this little how to helpful! Feel free to show me what you do for your student work space! And always remember: every moment can be a learning moment.

Sincerely from TK,

Wednesday, September 7, 2016

Classroom Tips: Making a Small Classroom work for Two


Hello friends!

Some really great and exciting things happened over the summer. I went to a Summer AVID Conference. I got to travel. But most exciting was...*drum roll*

I got to set up my classroom with my good friend and team lead so that we could room share for the entire 2016-2017 school year!! Isn't that exciting? (Listens to the crickets chirp in the background.) What? You mean you don't get excited to share your room with another teacher??

Well, if I'm honest, I wasn't either, but then my partner and I sat down and kind of hashed out how we wanted the room to look and how we wanted everything to go. After that, I was a lot more excited! (Being completely honest here.) So today, you get to see how we made our tiny room work for two!


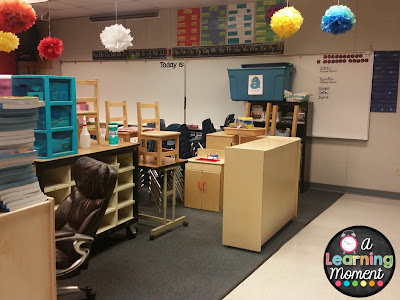
So we started with a room that looked like this...


and morphed into a cohesive blend of both of us!

It's a small classroom but with a few tweaks and tricks we've really made it work for us! Here's how we did it.

First: Designate your special "teacher spot." This is key. Neither one of us really like having a desk (nor do we really have room for 2 desks and 2 horseshoe tables) so we opted for simply having 2 horseshoe tables that we use for small group instruction and as our personal work space. Mine, (the mess that it is) looks like this...


And hers looks like this...


Second: Designate "common work places." We have one area that we use to work with the kids and we had to decide how we wanted it set up. We ended up using this rolling storage as our teacher work space where we project pictures and hook up our computer. It looks like this:


Third: Designate "student work spaces." After we had our teacher areas figured out, we positioned the student desks and the carpet area around them. (Luckily, most of the furniture stayed the same from previous years so positions weren't that difficult.) We wound up with areas that looked like the picture above!

Fourth: Designate "centers" or "play areas." Now this, admittedly, was the toughest part for us. Our room is small, and we took everything that was already in the room...and ADDED TO IT! So we kind of had to place the play areas where we had space.

We wound up with a room that fit our needs perfectly for the year!

Wall space was another conversation, but luckily there is quite a bit of wall space in our room. We split the boards 3 and 3, then set up our calendar wall. We have a large "theme board" that is split down the middle so we can display our themes as they change.

Kindergarten writing board
TK Art, Writing, and Math boards
Split theme board

Now, these steps can be done in what ever order you see fit. This was just the order we felt was the most beneficial for us. When setting up your classroom, it can always feel extremely overwhelming. My best tip: take it piece by piece. Don't be afraid to move things around until the big picture fits the picture in your head.

I hope you found some of these tips helpful! And always remember: every moment can be a learning moment!

Sincerely from TK,

Sunday, March 27, 2016

Hello Fairy Tales!

Hello!

So we've been super busy in the classroom recently, getting ready for Open House and then Spring Break (which I am currently on) but that still isn't an excuse for being so distant from here! So I've written a few blog posts and will schedule them to post fairly regular so you wont be without some fun news from our classroom!

Anyway, I'm here to talk about my favorite unit that we have covered so far this year (it's actually my favorite that we cover all year long) : Fairy Tales!! My Littles and I have spent that past month learning all about fairy tales and folk tales. We did so many fun activities that came out so awesome!

We started our unit off with talking about common "rules" for both Fairy Tales and Folk Tales. We named specific stories that followed each rule, and then made a big poster showing the rules we needed to classify new stories we were going to read!


The first story we read was Jack and the Giant Beanstalk. This was the perfect way to kick off our unit because the kiddos got to do some science (which seems to be their favorite subject) and they had a "take home" product that parents were really impressed with. We got to grow our very own MAGIC BEANS! We started with a big chart and discussed the three main things our magic beans would need to grow: sun, soil, and water.


The kiddos replicated the chart on a paper plate that I divided into three, and I put that up on our science board. The next day we planted our very own magic beans.


I learned early on that I cannot grow anything to save my life if I have to worry about watering it every day, so now any time I have to grow something for the class I follow this method. I place dry soil in a Styrofoam cup punch a hole in the middle of the soil about an inch deep, place seed in the hole and then lightly cover. (The kiddos did all the this in class.) Then I put some water in the cup until the soil is MOIST, not muddy! Now, here is my trick for making things grow. I take a square of plastic wrap and lay it flat over the top of the cup and then rubber band it to the cup. This creates a greenhouse that will self-water and hold in the heat! I place all the cups in a plastic container and then place them in the sun every day. That's it folks! I don't touch them at all, except to pull them into the classroom for the night. This is how they turned out!


We read Cinderella next and talked a lot about what it might be like if we had a Fairy Godmother. We talked about the wishes we would make, and many students were actually quite concerned about whether or not they could use wishes for other people! I had a bunch of my littles share with the class what they would wish for with a Fairy Godmother, and many asked for toys, some asked for things for their family, and others asked for things for their friends. They were all really excited to share and it made my little teacher heart happy! We did a guided writing assignment (my early birds did one sentence, and my late birds do another) and then completed the craftivity that went with it. My kiddos got to pick the color hand they wanted and the colors for their "magic burst" behind their wands, so those aspects are 100% individual to each student.


 My early birds came up with the sentence "I would do magic." They helped me spell everything, and I wrote each letter down just as they told me to spell.

Right now they have select sight words they need to spell correctly, and then they need to focus on the beginning and ending sounds of words. I think they did pretty stinkin' awesome!


My late birds chose to write the sentence "I would give presents." Many students wanted to give presents to specific people, but trying to write so many different people got really complicated so we just settled on giving presents in general.

Again, they are focusing on the beginning and ending sounds with the select sight words being spelled correctly.


After all the writing and gluing was done I went back with glue and glitter and I glittered EVERYTHING! It came out super cute! (Although, I'm still finding glitter all over the room, and the night custodian that cleans the kindergarten wing still hasn't forgiven me. Haha!)

The next activity we worked on was a compare and contrast activity between The Three Little Pigs, and The Three Little Fish.


This was the version of The Three Little Pigs that I read to my littles. It was the perfect way to introduce folk tales since it so clearly followed all the special rules we were looking for.


This story is so adorable! (**I am NOT sponsored to promote this book at all! I just love it and I use it every year when I do this unit.) It mirrors The Three Little Pigs and is a great way to get young thinkers to compare and contrast two stories! We did a quick compare of the stories and found ways the stories were the same, and we did a contrast to show how the stories were different. The typical differences were the settings and characters since one takes place on land and one takes place in the sea. My littles LOVED talking to each other about the differences between the two stories.

After we compared and contrasted I had my kiddos complete another craftivity that related to each book. 


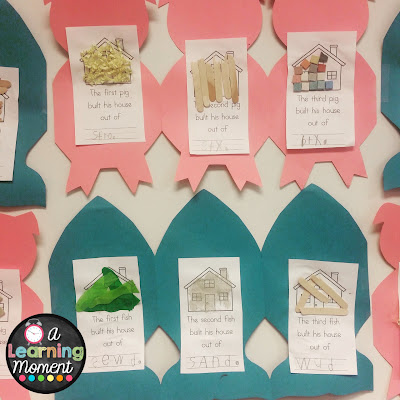
My early birds completed the Three Little Fish craftivity and my late birds completed the Three Little Pigs craftivity. I gave each student actual pieces to identify the materials used to build the houses in each book. I did substitute a few things that I couldn't get a hold of in time (i.e. seaweed and hay/straw) so I used green tissue paper cut into wavy strips for seaweed, and I used yellow present stuffing to simulate straw. If you have those materials available you can use them, although I don't know how seaweed would do with the glue or if it might start to smell. If you try it, let me know how it turns out!

The students again focused on phonetic spelling. Straw, Sticks, and Bricks.
Phonetic spelling of seaweed, sand, and wood.

Our last big activity we worked on was actually inspired by an AVID lesson I did for some district higher-ups. I have a big theme board that I decorate with every new theme we do. For our AVID lesson I had the kiddos work together to create a castle out of large shapes that had been cut out. They did a great job. The next day I gave them individual sheets of paper and they had to do it on their own. Each castle was unique and beautiful and the kids had so much fun. When they were done creating they needed to come to me and identify how many of each shape they used to create their castle. 

**Note: We focus on the four basic shapes: square, rectangle, circle, and triangle, so those are the four shapes on my write up. If you do more, you can always add more or have them verbally identify them!

Here is the large "theme board" that proudly displays their AVID creations as well as their individual creations.
As you can see, they all did a wonderful job! Here are a few up close looks at some of the student works:

 They are a little blurry but the write up says "To make my fairy tale castle I used ___ squares, ___ rectangles, ___ circles, and ___ triangles." The kiddos were expected to count each shape and then write the number in the correct blank. My kiddos were expected to create their own circles, and for beginners (some of these littles have never even looked at scissors before much less cut with them) I think they did a great job of trying to cut out some circles from some rectangles and square pieces!

I did a few miscellaneous worksheets to tie in Rapunzel, Goldilocks and the Three Bears, and the Princess and the Pea, but weren't nearly as exciting or as engaging as these fun activities.

Well, I hope, if you are ever in the mood for some fairy tale activities that you give some of these a try! My littles loved them and I know yours will too! And I hope, above everything else, that you always remember: Every moment is a learning moment!

Sincerely from TK,


Friday, January 22, 2016

How I Tackle Name Recognition

Hello!

I know, I know. I can already here you saying "Geez Nichole...you've been gone for almost TWO MONTHS!" I know. I'm sorry. Life got really complicated, but I have made it a New Years resolution to be more diligent with this blog.

So here I am...with some fun ways that I practice name recognition with my kiddos! Every year I start with me writing the letters out and then as we progress they start writing the letters down themselves. (I promise it'll make more sense as I explain the activities.)

1. Glue and Tissue paper names!


I always start the year by making a set of "name tracers" and a set of "bubble name" plates for the kids. I keep them in my files and make copies as I need them through out the year. This is something I do for morning work at the beginning of the year and put up around the room for quick student work samples. The kids take their finger and fill in the bubble letters with a light layer (at least I always give directions for light layer...it doesn't always work out that way) of glue. Then they take pre-cut pieces of rainbow tissue paper and roll/push them into little balls and stick them on the glue. The pushing and pinching works the kiddos' fine motor, so it's a double whammy.

2. Construction paper names!


This activity is much like the tissue paper names, but instead I use construction paper. The tougher paper makes it even more of a fine motor activity. Again, they still spread a small layer of glue with their fingers and then they must rip small pieces of construction paper and make those into balls. They, again, stick those balls into the glue until their bubble name is full.

3. Rainbow writing names!


This is a different way I have them use their bubble name plates. My kiddos are very familiar with "rainbow writing." If anything is is written in bubble letters the kiddos automatically know that we will be rainbow writing whatever it is. This is a great activity to practice letter formation and proper penmanship/letter strokes.

4. Clip Chart names!


I'm all for fine motor practice (because that's something that is on my report card) so for our behavior chart every kiddo gets a clip with their name on it. Through out the year they learn which clip is theirs by recognizing their name on it and moving it up or down on the chart.

5. Cubby name!


Each kiddo also has a cubby that has name and a small picture of them on it. After Christmas break I go through and remove the pictures so that the kiddos are focusing solely on what their name looks like.

6. Monthly name activities!


Each month we work on a new activity to practice name recognition. Like I said in the beginning of this post, these activities start with me writing the letters of their name and they have to put them in order and glue them down. As the year progresses they write more and more of the letters. Once they have mastered their first name I also work on their last name the same way. I do these activities during small group instruction during our Universal Access time and they go up on our sequencing board once they have dried. Above are some pictures of our monthly activities.

7. Homework name practice!


Here is where the name tracers come in handy. I run these off weekly as part of their homework practice. At the top of the page their name is written with the stroke arrows, then there are two rows with dotted line letters, and then three rows of just empty "tracks" for the kiddos to practice their name on their own with out help. I will often prompt parents that if their kiddo is really struggling with writing their names to write it out in high lighter first and then let their kid trace over that. They need to gradually release and let their kiddo do it on their own, but for the first few weeks, this is a great way for kids to get the reinforcement at home too!


These are just a FEW of the ways I practice name recognition in my classroom. There are many more, but these are the ones that I felt were the most helpful and the most fun for my kiddos! I hope they are helpful to anyone reading!

Always remember: every moment and be a learning moment!
Related Posts Plugin for WordPress, Blogger...