Sunday, March 27, 2016

Hello Fairy Tales!

Hello!

So we've been super busy in the classroom recently, getting ready for Open House and then Spring Break (which I am currently on) but that still isn't an excuse for being so distant from here! So I've written a few blog posts and will schedule them to post fairly regular so you wont be without some fun news from our classroom!

Anyway, I'm here to talk about my favorite unit that we have covered so far this year (it's actually my favorite that we cover all year long) : Fairy Tales!! My Littles and I have spent that past month learning all about fairy tales and folk tales. We did so many fun activities that came out so awesome!

We started our unit off with talking about common "rules" for both Fairy Tales and Folk Tales. We named specific stories that followed each rule, and then made a big poster showing the rules we needed to classify new stories we were going to read!


The first story we read was Jack and the Giant Beanstalk. This was the perfect way to kick off our unit because the kiddos got to do some science (which seems to be their favorite subject) and they had a "take home" product that parents were really impressed with. We got to grow our very own MAGIC BEANS! We started with a big chart and discussed the three main things our magic beans would need to grow: sun, soil, and water.


The kiddos replicated the chart on a paper plate that I divided into three, and I put that up on our science board. The next day we planted our very own magic beans.


I learned early on that I cannot grow anything to save my life if I have to worry about watering it every day, so now any time I have to grow something for the class I follow this method. I place dry soil in a Styrofoam cup punch a hole in the middle of the soil about an inch deep, place seed in the hole and then lightly cover. (The kiddos did all the this in class.) Then I put some water in the cup until the soil is MOIST, not muddy! Now, here is my trick for making things grow. I take a square of plastic wrap and lay it flat over the top of the cup and then rubber band it to the cup. This creates a greenhouse that will self-water and hold in the heat! I place all the cups in a plastic container and then place them in the sun every day. That's it folks! I don't touch them at all, except to pull them into the classroom for the night. This is how they turned out!


We read Cinderella next and talked a lot about what it might be like if we had a Fairy Godmother. We talked about the wishes we would make, and many students were actually quite concerned about whether or not they could use wishes for other people! I had a bunch of my littles share with the class what they would wish for with a Fairy Godmother, and many asked for toys, some asked for things for their family, and others asked for things for their friends. They were all really excited to share and it made my little teacher heart happy! We did a guided writing assignment (my early birds did one sentence, and my late birds do another) and then completed the craftivity that went with it. My kiddos got to pick the color hand they wanted and the colors for their "magic burst" behind their wands, so those aspects are 100% individual to each student.


 My early birds came up with the sentence "I would do magic." They helped me spell everything, and I wrote each letter down just as they told me to spell.

Right now they have select sight words they need to spell correctly, and then they need to focus on the beginning and ending sounds of words. I think they did pretty stinkin' awesome!


My late birds chose to write the sentence "I would give presents." Many students wanted to give presents to specific people, but trying to write so many different people got really complicated so we just settled on giving presents in general.

Again, they are focusing on the beginning and ending sounds with the select sight words being spelled correctly.


After all the writing and gluing was done I went back with glue and glitter and I glittered EVERYTHING! It came out super cute! (Although, I'm still finding glitter all over the room, and the night custodian that cleans the kindergarten wing still hasn't forgiven me. Haha!)

The next activity we worked on was a compare and contrast activity between The Three Little Pigs, and The Three Little Fish.


This was the version of The Three Little Pigs that I read to my littles. It was the perfect way to introduce folk tales since it so clearly followed all the special rules we were looking for.


This story is so adorable! (**I am NOT sponsored to promote this book at all! I just love it and I use it every year when I do this unit.) It mirrors The Three Little Pigs and is a great way to get young thinkers to compare and contrast two stories! We did a quick compare of the stories and found ways the stories were the same, and we did a contrast to show how the stories were different. The typical differences were the settings and characters since one takes place on land and one takes place in the sea. My littles LOVED talking to each other about the differences between the two stories.

After we compared and contrasted I had my kiddos complete another craftivity that related to each book. 


My early birds completed the Three Little Fish craftivity and my late birds completed the Three Little Pigs craftivity. I gave each student actual pieces to identify the materials used to build the houses in each book. I did substitute a few things that I couldn't get a hold of in time (i.e. seaweed and hay/straw) so I used green tissue paper cut into wavy strips for seaweed, and I used yellow present stuffing to simulate straw. If you have those materials available you can use them, although I don't know how seaweed would do with the glue or if it might start to smell. If you try it, let me know how it turns out!

The students again focused on phonetic spelling. Straw, Sticks, and Bricks.
Phonetic spelling of seaweed, sand, and wood.

Our last big activity we worked on was actually inspired by an AVID lesson I did for some district higher-ups. I have a big theme board that I decorate with every new theme we do. For our AVID lesson I had the kiddos work together to create a castle out of large shapes that had been cut out. They did a great job. The next day I gave them individual sheets of paper and they had to do it on their own. Each castle was unique and beautiful and the kids had so much fun. When they were done creating they needed to come to me and identify how many of each shape they used to create their castle. 

**Note: We focus on the four basic shapes: square, rectangle, circle, and triangle, so those are the four shapes on my write up. If you do more, you can always add more or have them verbally identify them!

Here is the large "theme board" that proudly displays their AVID creations as well as their individual creations.
As you can see, they all did a wonderful job! Here are a few up close looks at some of the student works:

 They are a little blurry but the write up says "To make my fairy tale castle I used ___ squares, ___ rectangles, ___ circles, and ___ triangles." The kiddos were expected to count each shape and then write the number in the correct blank. My kiddos were expected to create their own circles, and for beginners (some of these littles have never even looked at scissors before much less cut with them) I think they did a great job of trying to cut out some circles from some rectangles and square pieces!

I did a few miscellaneous worksheets to tie in Rapunzel, Goldilocks and the Three Bears, and the Princess and the Pea, but weren't nearly as exciting or as engaging as these fun activities.

Well, I hope, if you are ever in the mood for some fairy tale activities that you give some of these a try! My littles loved them and I know yours will too! And I hope, above everything else, that you always remember: Every moment is a learning moment!

Sincerely from TK,


Friday, January 22, 2016

How I Tackle Name Recognition

Hello!

I know, I know. I can already here you saying "Geez Nichole...you've been gone for almost TWO MONTHS!" I know. I'm sorry. Life got really complicated, but I have made it a New Years resolution to be more diligent with this blog.

So here I am...with some fun ways that I practice name recognition with my kiddos! Every year I start with me writing the letters out and then as we progress they start writing the letters down themselves. (I promise it'll make more sense as I explain the activities.)

1. Glue and Tissue paper names!


I always start the year by making a set of "name tracers" and a set of "bubble name" plates for the kids. I keep them in my files and make copies as I need them through out the year. This is something I do for morning work at the beginning of the year and put up around the room for quick student work samples. The kids take their finger and fill in the bubble letters with a light layer (at least I always give directions for light layer...it doesn't always work out that way) of glue. Then they take pre-cut pieces of rainbow tissue paper and roll/push them into little balls and stick them on the glue. The pushing and pinching works the kiddos' fine motor, so it's a double whammy.

2. Construction paper names!


This activity is much like the tissue paper names, but instead I use construction paper. The tougher paper makes it even more of a fine motor activity. Again, they still spread a small layer of glue with their fingers and then they must rip small pieces of construction paper and make those into balls. They, again, stick those balls into the glue until their bubble name is full.

3. Rainbow writing names!


This is a different way I have them use their bubble name plates. My kiddos are very familiar with "rainbow writing." If anything is is written in bubble letters the kiddos automatically know that we will be rainbow writing whatever it is. This is a great activity to practice letter formation and proper penmanship/letter strokes.

4. Clip Chart names!


I'm all for fine motor practice (because that's something that is on my report card) so for our behavior chart every kiddo gets a clip with their name on it. Through out the year they learn which clip is theirs by recognizing their name on it and moving it up or down on the chart.

5. Cubby name!


Each kiddo also has a cubby that has name and a small picture of them on it. After Christmas break I go through and remove the pictures so that the kiddos are focusing solely on what their name looks like.

6. Monthly name activities!


Each month we work on a new activity to practice name recognition. Like I said in the beginning of this post, these activities start with me writing the letters of their name and they have to put them in order and glue them down. As the year progresses they write more and more of the letters. Once they have mastered their first name I also work on their last name the same way. I do these activities during small group instruction during our Universal Access time and they go up on our sequencing board once they have dried. Above are some pictures of our monthly activities.

7. Homework name practice!


Here is where the name tracers come in handy. I run these off weekly as part of their homework practice. At the top of the page their name is written with the stroke arrows, then there are two rows with dotted line letters, and then three rows of just empty "tracks" for the kiddos to practice their name on their own with out help. I will often prompt parents that if their kiddo is really struggling with writing their names to write it out in high lighter first and then let their kid trace over that. They need to gradually release and let their kiddo do it on their own, but for the first few weeks, this is a great way for kids to get the reinforcement at home too!


These are just a FEW of the ways I practice name recognition in my classroom. There are many more, but these are the ones that I felt were the most helpful and the most fun for my kiddos! I hope they are helpful to anyone reading!

Always remember: every moment and be a learning moment!

Tuesday, November 10, 2015

Rainbow Sight Words!!

Hello!

So we have officially started our second trimester at school. Grades are in; conferences are done. I can breathe a sigh of relief! Now that we have started our second trimester I have officially started teaching sight words! This concept isn't "graded" on our report card until third trimester (so end of the year) but I start teaching it now because many of my kiddos like having the extra time to really master this concept.

Since I am in TK I don't have specific words that I need to teach per my report card. I chose 30 words from the Fry's High Frequency lists that they need to know for kindergarten. TK is all about preparing them for kindergarten so I figured using the same words would be beneficial.

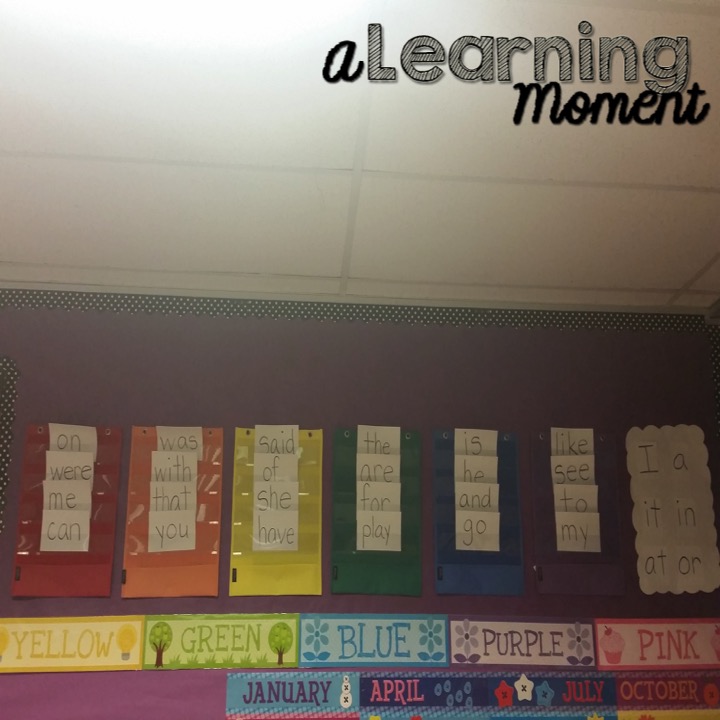
I arranged my words into a set of "rainbow" lists which are put up in my room in color coded pocket charts. (THANK YOU WALMART!)


White list: I, a, in, it, at, or.
Purple: like, see, to, my
Blue: is, he, and, go
Green: the. are, for, play
Yellow: said, of, she, have
Orange: on, with, that, you
Red: was, were, me, can

I introduce the words in a variety of ways. I start with printing out 30 pictures of a bus and writing the words in the middle of each bus. Then we sing the song "The word on the bus..." We cover one word a week. I also write the word on index cards and create necklaces for each word that I wear and the kiddos must name before they leave the room to go to the bathroom or recess or going home. Once I have covered the word I tape the bus to the floor on the tile (these are great for line-up activities) and I tape the necklace to the door. (These are great for the "Slap it!"activity we play once we cover the whole list.)

The kiddos also each get a sight word sticker book that has the words organized on color paper by each list.


As they master a word/list they get stickers next to that word. When they master the whole list they get different parts of our rainbow on our "Rainbow Sight Word" wall. The white list they get to write their name on a cloud, and for each colored list they get a sticker on their cloud until they have the whole rainbow.


After the kids get their stickers and rainbow pieces they get a certificate, their picture taken and a class cheer. They also get their kindergarten sticker book too (I made the first 100 Fry words into a sticker book too. The kiddos get really excited about getting their blue kindergarten sticker book!)

I'm hoping that by starting earlier the kids get more exposure to the words and are able to master more of them. 

I love this time of year and all the fun things we get to learn and experience! Always remember, every moment can be a learning moment!

Sincerely from TK,


Wednesday, October 7, 2015

5 Facts About Me!

Hello!

So, throughout this wonderful blogging and TPT journey, I have met many wonderful people who have challenged me to become a better teacher, helped me to strengthen myself, and just generally boosted me up in many different ways. One of those amazing people is Nikki, from Teaching Autism (you should totally check out her blog if you haven't already!) and she is hosting a link up!

I have shared many different fun stories about my shenanigans in the classroom, but I feel like I haven't really shared much about myself or my personal life. So here I am...sharing five random facts about me! I hope you enjoy.


1. I am a shoe-aholic. I confess it...I totally am. I have a problem with shoe shopping and if I'm not monitored I'll spend every last penny on cute shoes! At one point in time (before I was married) I owned 63 pairs of shoes!!! When I moved in with my lovely husband I had to cut down. I am down now to 20 pairs of shoes total. 6 pairs of heels, 2 pairs of tennis shoes, 5 pairs of flats, 3 pairs of sandals, and 4 pairs of boots. It was so hard to cut down, but I did it and now live by the rule...if I get one I have to give one! It has saved my life! (If only I could apply this mentality to my clothes now...hmmmmmmm...)

2. My heart breaks when I see dogs in an over crowded shelter. I know exactly what happens to dogs when shelters get over crowded and many dogs don't have a fighting chance to find their forever home. I want to cry when I think about it. My biggest goal is to open a non-profit dog rescue to rescue loving dogs that are not adopted for whatever reason (be it breed-target legislation, age, health issues etc.) I hope to not just open a rescue, but I'd love to have different "sectors" of this rescue to help out many areas of the country with over crowded shelters. 

3. I am newly married. I will be celebrating 3 years of marriage with my husband (7.5 years together total) this November, and I cannot believe how the time has flown. He is my best friend, my other half, and even through our rough times, he does everything he can to show me loves me and I'm appreciated. I love him very much!

4. I write stories for fun. Usually with people, but I write stories for fun. Through high school I wrote 4 novels (over 300 pages each) and countless short stories. I would love to get these stories published, but I'm too insecure about my writing, I don't think I could EVER send it in for editing and to be considered for publishing! Eek! The idea is terrifying. 

5. I would LOVE to travel! I want to travel the world! I want to visit every country on the planet before I pass on. I don't know if I'll get there, but I want to do my best. I've already visited Mexico, Honduras, Grand Cayman, and 20 of the 50 states in America. It's not a lot yet, but it's a start for being only 26. I would love to see more of the world once I'm settled into my job, maybe after the kids (who are not born yet) are in college? I don't know. I don't have a plan yet...just a deep seated desire!

Well, that's it about me! Those are my 5 random facts. I hope you found them interesting? Maybe...just a little?

Thank you for reading, and always remember: every moment can be a learning moment!

Sincerely from TK,

Friday, October 2, 2015

Glue sponges!!

Hello!!

So we've been busily working through our year, getting used to classroom norms and routines. I've been POSITIVELY SWAMPED! I logged on to my blog to check how things were going with my redesign...and I realized, I hadn't posted since mid-August!! I'm horrible! 

I wanted to give a little update on some fun things we've been working on in my classroom and the wonderful tools that have helped with making that possible! Now, a good portion of my report card focuses on motor skills...and I've been doing {these} wonderful guided art lessons by TLC Lessons that I purchased (they are AMAZING) but...they require A LOT of glue so the construction paper sticks. My solution? GLUE SPONGES!! 

Now, I can just about HEAR you all saying, "But Nichole...what about glue sticks!? They're less messy, and easier to use!" and I completely agree...they are less messy and easier to use, but the glue sticks we get from our supply closet seem to be construction paper repellent. It takes A LOT of glue stick to make the construction paper pieces stick. Back to my solution: glue sponges. Last year I was able to use glue bottles, but I found my kids still used  a ton of glue no matter how I tried to remind them not to. I taught them "dot, dot, not a lot" and I told them that "we don't want to make our papers cry." Yet still, every time I did an art project I was wiping up glue off the tile in my classroom.

This year, my kiddos are younger, and in need of more time to grow and mature with our materials. I didn't want to waste a lot of glue while trying to teach them the different methods I'd used. I did a lot of research and decided to try out glue sponges. I already had these cute little orange containers that I bought at the dollar store (2 to a pack) that I used for "piggy banks" a couple years back!


I numbered them for my kiddos so they could keep track of their lids.

I went to the store by my house and found sponges on clearance! CLEARANCE! A pack of 4 for $1.35! Did I mention these were massive sponges that I was able to cut into quarters?? Yeah. So one pack of 4 got me 16 sponges! I bought another pack of 4 (smaller) sponges that I cut in half and viola! I had 24 sponges cut to just the right size for my little containers. 

These were the last few left that I didn't cut up.

Now I have to put a disclaimer out there...I didn't actually READ a lot of how-to's on how to make glue sponges...I just assumed toss a sponge in a container and cover with glue. WRONG! After I made a complete mess of the first one, I went back and did my homework. I found out that I'd skipped not one - but two crucial steps to help make glue sponges work! *Sigh* This is why you do your homework kids! 

So day 2...this was how I made my glue sponges. I started by taking my sponge pieces and dropping them all into my sink in my classroom. I filled the sink with a little bit of water just to dampen the sponges and get out any chemicals that might be in the sponges. Then I went to the containers and put a thin layer of glue along the bottom. I grabbed a sponge and wrung it out. You do not want a ton of water in your sponge because it will not soak up the glue! You just want it damp. I placed the sponge in the puddle of glue and then put another thin layer of glue on top of the sponge. I placed the lid on it and then walked away. I'm so glad I walked away. The next morning there was no glue in the container! It had all soaked up into the sponge. I put another layer of glue on top of the sponge and left it. The glue settled around the sponge and viola! My handy-dandy glue sponges! Here is the finished product!


 I love them! The kiddos just have to press down on the sponge and it deposits just the right amount of glue on the paper. There is no spilled glue, no wiping glue off the tiles! I did a little happy dance after our first art assignment when I noticed there were no crying papers!! 

One draw back is, I do have to fill them once a week, but I typically pour a little glue on top of the sponge on Friday afternoon before I go home for the weekend and then by Monday the glue has settled properly. It's just amazing! I don't think I can ever go back to glue bottles again. 

Did I mention that they're the perfect size for students to share? I put one down between two students and they can each use it! It's just perfect. It teaches the kids about taking turns and sharing, while also teaching them the appropriate amount of glue to use. Did I mention perfect? (I did...oh. Ok.)


Anyway, I hope some of you find this helpful and maybe you can make your own glue sponges for your kiddos! Always remember that every moment can be a learning moment!

Sincerely from TK,

Related Posts Plugin for WordPress, Blogger...