Showing posts with label hacks. Show all posts

Friday, October 2, 2015

Glue sponges!!

Hello!!

So we've been busily working through our year, getting used to classroom norms and routines. I've been POSITIVELY SWAMPED! I logged on to my blog to check how things were going with my redesign...and I realized, I hadn't posted since mid-August!! I'm horrible! 

I wanted to give a little update on some fun things we've been working on in my classroom and the wonderful tools that have helped with making that possible! Now, a good portion of my report card focuses on motor skills...and I've been doing {these} wonderful guided art lessons by TLC Lessons that I purchased (they are AMAZING) but...they require A LOT of glue so the construction paper sticks. My solution? GLUE SPONGES!! 

Now, I can just about HEAR you all saying, "But Nichole...what about glue sticks!? They're less messy, and easier to use!" and I completely agree...they are less messy and easier to use, but the glue sticks we get from our supply closet seem to be construction paper repellent. It takes A LOT of glue stick to make the construction paper pieces stick. Back to my solution: glue sponges. Last year I was able to use glue bottles, but I found my kids still used  a ton of glue no matter how I tried to remind them not to. I taught them "dot, dot, not a lot" and I told them that "we don't want to make our papers cry." Yet still, every time I did an art project I was wiping up glue off the tile in my classroom.

This year, my kiddos are younger, and in need of more time to grow and mature with our materials. I didn't want to waste a lot of glue while trying to teach them the different methods I'd used. I did a lot of research and decided to try out glue sponges. I already had these cute little orange containers that I bought at the dollar store (2 to a pack) that I used for "piggy banks" a couple years back!


I numbered them for my kiddos so they could keep track of their lids.

I went to the store by my house and found sponges on clearance! CLEARANCE! A pack of 4 for $1.35! Did I mention these were massive sponges that I was able to cut into quarters?? Yeah. So one pack of 4 got me 16 sponges! I bought another pack of 4 (smaller) sponges that I cut in half and viola! I had 24 sponges cut to just the right size for my little containers. 

These were the last few left that I didn't cut up.

Now I have to put a disclaimer out there...I didn't actually READ a lot of how-to's on how to make glue sponges...I just assumed toss a sponge in a container and cover with glue. WRONG! After I made a complete mess of the first one, I went back and did my homework. I found out that I'd skipped not one - but two crucial steps to help make glue sponges work! *Sigh* This is why you do your homework kids! 

So day 2...this was how I made my glue sponges. I started by taking my sponge pieces and dropping them all into my sink in my classroom. I filled the sink with a little bit of water just to dampen the sponges and get out any chemicals that might be in the sponges. Then I went to the containers and put a thin layer of glue along the bottom. I grabbed a sponge and wrung it out. You do not want a ton of water in your sponge because it will not soak up the glue! You just want it damp. I placed the sponge in the puddle of glue and then put another thin layer of glue on top of the sponge. I placed the lid on it and then walked away. I'm so glad I walked away. The next morning there was no glue in the container! It had all soaked up into the sponge. I put another layer of glue on top of the sponge and left it. The glue settled around the sponge and viola! My handy-dandy glue sponges! Here is the finished product!


 I love them! The kiddos just have to press down on the sponge and it deposits just the right amount of glue on the paper. There is no spilled glue, no wiping glue off the tiles! I did a little happy dance after our first art assignment when I noticed there were no crying papers!! 

One draw back is, I do have to fill them once a week, but I typically pour a little glue on top of the sponge on Friday afternoon before I go home for the weekend and then by Monday the glue has settled properly. It's just amazing! I don't think I can ever go back to glue bottles again. 

Did I mention that they're the perfect size for students to share? I put one down between two students and they can each use it! It's just perfect. It teaches the kids about taking turns and sharing, while also teaching them the appropriate amount of glue to use. Did I mention perfect? (I did...oh. Ok.)


Anyway, I hope some of you find this helpful and maybe you can make your own glue sponges for your kiddos! Always remember that every moment can be a learning moment!

Sincerely from TK,

Monday, August 17, 2015

Help with Holding a Pencil!

Hello!!

So I have officially started school, and boy, this years class has some new challenges that I wasn't faced with last year! I am excited to tackle each one head on. First, I have a good portion of my class that have never held a pencil before, at least not "correctly." So that is what this post will be about!

I have many methods that I use to work with my kiddos on correct pencil grip. The first one is a fuzzy ball! I give the kids a pom-pom of their favorite color and I tell them to hold the ball with their "bottom" three fingers. This method was really successful last year, but unfortunately was not so successful this year. And, as an added downfall...my kiddos this year termed the pom-pom hand method as "making a gun." Big no no...so I had to find something quick to help my kiddos that didn't look like I was teaching them to play guns with their writing hands!

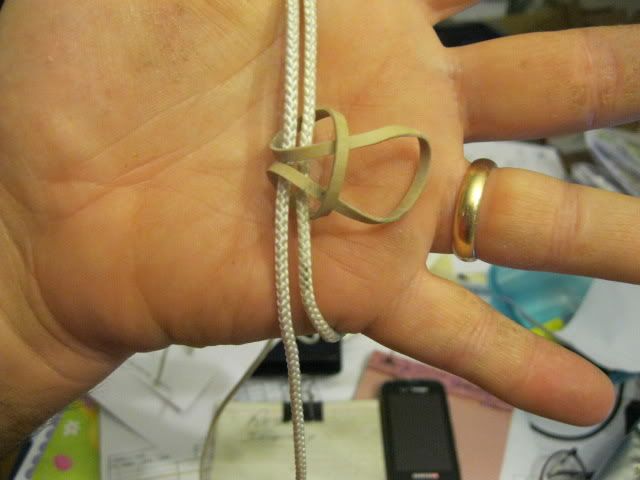
In came the rubber bands! Now, you may  be saying, "Nichole...how do rubber bands help a kid hold a pencil?!" Well, I'm here to show you! First I wrapped the rubber band around the pencil so that it was secure...like so...
Like this...except around a pencil
 Then I had the kiddos slip the big loop around their wrist, with the pencil resting on their arm and VIOLA!! It worked! I had two wonderful models show me exactly how it had helped them in holding their pencils!


I still have a few that need some other method (this and the ball method did not work) so I'm still on the hunt for new ways to work on pencil grip! If you have any suggestions, let me know! I'm always willing to give things a try!

I hope this helped anyone who might be struggling with pencil grip!

Always remember: every moment can be a learning moment!!

Sincerely from TK,
Nichole

Sunday, January 18, 2015

Top 5 Teacher Hacks

As a teacher I am constantly trying to streamline my day and make things easier. Managing a class while working with limited space and only so many resources can be a bit over whelming. Today I am going to blog about my top 5 teacher hacks that have made my teaching experience so much easier. 

1. Clear containers for construction paper

I know they're file containers but I use them for my construction paper. I can see exactly what I have!

Ok, so I don't know if this is so much a hack, as I discovered these awesome containers and I love them because I can store my 9x12 sheets of construction paper in them perfectly. I can see inside and know what colors I have, what I don't have, how much of each color etc. These babies have saved me so many times when I needed to quickly pull out some construction paper for a co-worker, project, or what ever I have planned. 

2. Salt/Pepper shakers for glitter

I filled them up about 1/3 of the way with a color of glitter. I have about 1 set of 8 per table. 

Now, I may be crazy for this one, but it actually works for me and my kiddos. Use at your own discretion! I found a bunch of small clear salt and pepper shakers at the dollar tree one visit and I snagged up as many as I could get my hands on. I bust these bad boys out on VERY special occasions so the kids can experience shaking and aiming their glitter on their glue. They have to share a color (I wasn't rich enough to get one set of 8 for each kid) between about 2-
3 kids. Now, I want to put out a disclaimer. I HAVE VERY RESPONSIBLE KIDDOS THIS YEAR! They have really gone above and beyond to show me they know how to take care of my things, their things, their supplies and the classroom. They know better than to waste glitter by dumping it on the floor, or dumping a whole lot onto their paper and then throwing the majority away. I trust them to use the glitter properly, and we use it so rarely that they know it is a treat. I have not had a problem with my kids this year...ask me again next year and it might be a completely different story.

3. Indoor drying rack

I use clothes pins to "attach" student work to the rack. SAVES SO MUCH COUNTER SPACE!

I cannot gush about this product enough. My sister-in-law bought me an inexpensive indoor clothes drying rack for Christmas and I have used it almost every single day in the classroom. It is a super easy way to have kids dry their work when working with paint or glue. Mine is collapsible, so I can easily collapse it and tuck it away in a cabinet or under a counter and then just as easily pull it out and set it up. It holds 22 8.5x11 pages easily with clothes pins, and depending on the size of the project can hold as many as 44 student work samples. It is light weight and I just love it. I no longer have to lose counter space (of which I have precious little). I have been working with my kiddos on how to use liquid glue properly and this has been a great tool. Before they didn't understand WHY a puddle wasn't ok, other than it was just a waste, now they can see that when they use too much glue their paper "cries" and some of the pieces fall off. It has really cut down on glue puddles and wasting glue. Also, I've had less messy hands because they are using the appropriate amount of glue instead of glopping it on all over the place. 

4. Gallon ziplocs

I label mine for the classroom Monday-Friday and then put my papers inside!

My team lead, and good friend, taught me this trick at the beginning of the year. She has little baskets that are about 9"x12" big (perfect for laying paper down flat in) and she uses one each week. I started out with a basket a day, but when you're planning 2+ weeks into the future it can get space consuming. To help get me prepped and ready for future lessons I turned to my friend and what she said CHANGED MY PREPPING LIFE! She takes a gallon ziploc bag and writes the day on it. One for each day and then stuffs all her prepped materials for the day into each bag. She then stacks the bags (Friday on bottom) into the basket. She can get 6 weeks of planning and prepping down to 6 baskets which takes up half of a cubby top for her! It is genius. I have been stock piling gallon ziplocs because I use them so much. She also showed me that I can prep out my guided art lessons and make a bag specifically for those that can be used year after year after year. Fill the bag with all your pieces and then restock as needed, the bag holds the extras so eventually you wont need to prep for that year/activity. Maybe I'm just behind on this trick but it really has changed my life. Because of this trick I was actually able to plan AND prep almost 6 weeks into the future, allowing me to focus on other things like my intervention groups. 

5. Colored stickers

I used smiley faces, stars, push pin and plain dot stickers to code my library.

Ok...this isn't so much a teacher hack as I just use these darn things for EVERYTHING. In particular, this year I have been having a hard time with my kiddos putting library books away in the correct areas. I'm mildly OCD and my library was the biggest expense to me to put together so I want my books to be taken care of and treated nicely. They also need to be put back rather than just tossed on a shelf. I started with the idea of just putting a colored dot inside the front cover, but that wasn't a visual enough cue for me to see without opening the book, whether or not it was in the correct place. I created color coded labels for my baskets (maybe one of my five should have been little dollar tree baskets) and then placed matching colored stickers on EVERY book that belonged in that basket. Now I have and organized library and I don't have to worry about going and rearranging every week. It's a beautiful thing. My kids kind of think of it as a game. They love to match the stickers to the color label and then show me what a good job they've done being responsible. This is especially helpful during our reader buddy time. Imagine 50 kids all trying to pick out and put books back...before my colored stickers it was a nightmare! Now, I have those 4th graders as well as my little TKs matching the stickers and taking care of our materials. It's a beautiful thing. I do still have the occasional student who doesn't care and just tosses a book where ever they feel like it, but between others "reminding" them about the stickers or others correcting the mistake on their own, I rarely have to do any super big reorganization of our library. 

These are my top 5 hacks so far. They have really worked for me to make my classroom function better or to help keep me more organized. I'm constantly looking for new hacks and creative ways to use products. Leave me a comment below to let me know if you have a hack that wasn't featured. I'd love to hear about them!

I hope everyone has been having a great time in your classrooms and homes. Always remember, every moment can be a learning moment!

Sincerely from TK,
Nichole
Related Posts Plugin for WordPress, Blogger...